
Hotline
+86-136 8495 9862
Email:cennia@szmizhi.com
Add::104,Building 27,Third Industrial Zone, Longxi Community,Longgang District,Shenzhen,China.
Coil Forming & Handling Equipment
Surface Treatment Equipment
Solutions
Application
About Us

Welcome to MIZHI
For consultation/feedback, please call the service hotline: +86-136 8495 9862 Email:cennia@szmizhi.com

Coil Forming & Coil Handling Solutions
Surface Treatment Solutions


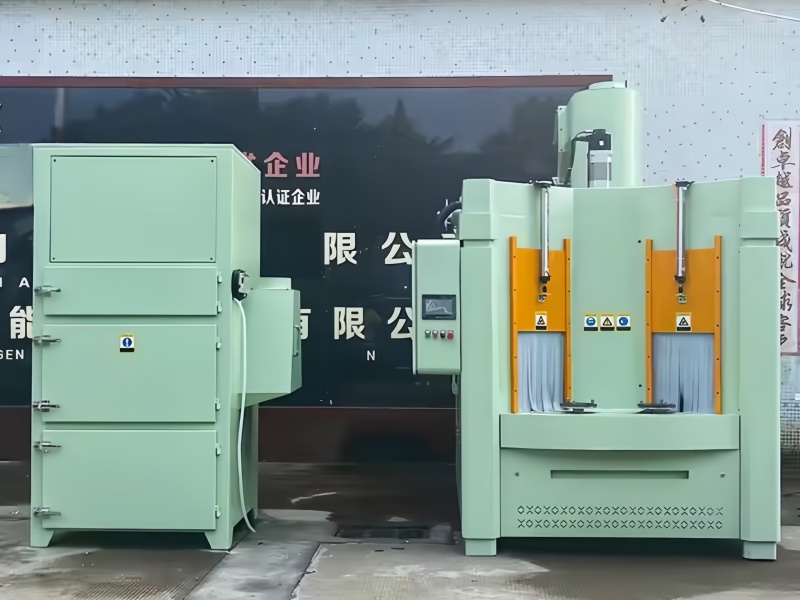
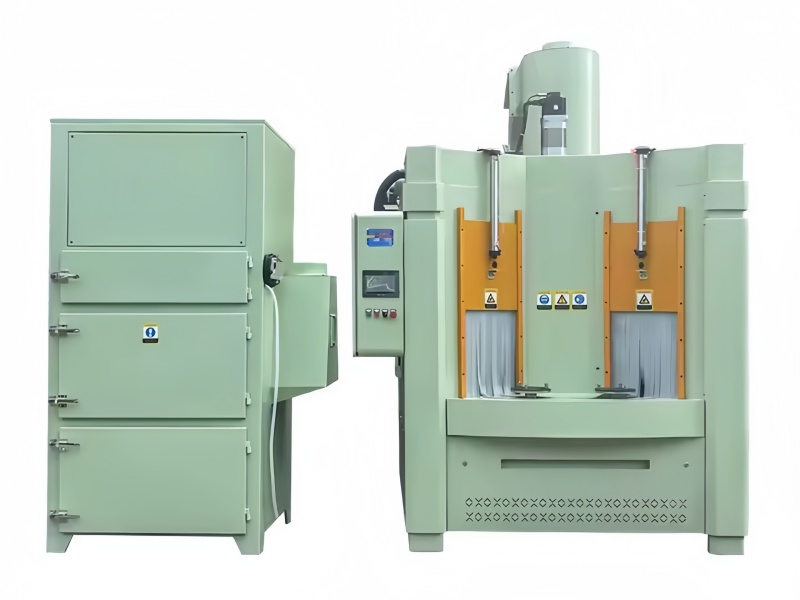
Congratulations on your sand blasting cabinet! This manual serves as your definitive guide to safely and effectively operating, maintaining, and troubleshooting your equipment. Whether you’re a hobbyist, a workshop professional, or an industrial operator, understanding your cabinet’s features and following best practices is crucial for achieving optimal results while prioritizing safety. This manual covers everything from assembly and setup to advanced operational techniques, ensuring you maximize the lifespan and performance of your sand blasting cabinet.
1 Unpacking and Inspection
Check Components:
Upon unpacking, verify the following parts are included:
applicationCabinet enclosure with viewing window
applicationBlasting gun and nozzle(s)
applicationAbrasive hopper and feed valve
applicationDust collection system (filters, drawers, etc.)
applicationGloves and glove ports
applicationAir hose and connectors
applicationUser manual and safety documentation
Inspect for Damage:
Examine the cabinet for dents, cracks, or broken seals. Check that the viewing window is free of scratches or chips, and ensure all moving parts (doors, valves) operate smoothly.
2 Placement and Environment
Location Selection:
applicationChoose a well-ventilated area, preferably with exhaust fans to supplement the cabinet’s dust control.
applicationEnsure at least 3 feet of clearance around the cabinet for maintenance and airflow.
applicationAvoid placing near flammable materials or sources of ignition.
Leveling the Cabinet:
Use a spirit level to adjust the cabinet’s feet or base, ensuring it sits evenly. An unlevel cabinet can cause abrasive to accumulate unevenly, affecting performance.
3 Air Supply Connection
Compressor Requirements:
Refer to your cabinet’s specifications for required CFM (cubic feet per minute) and PSI (pounds per square inch). Most manual cabinets need 5-10 CFM at 90 PSI.
Hose Installation:
applicationConnect the air hose from your compressor to the cabinet’s inlet port, using appropriate fittings (typically 1/4" or 3/8" NPT).
applicationEnsure all connections are tight to prevent air leaks, which can reduce blasting pressure.
4 Dust Collection System Setup
Filter Installation:
applicationInstall primary filters (cloth or cartridge) in the exhaust port, following the manufacturer’s diagram.
applicationIf your cabinet includes a HEPA filter, carefully unpack and install it in the designated housing, avoiding contact with contaminants.
Dust Drawer Placement:
Slide the dust collection drawer into its compartment at the base of the cabinet, ensuring it fits securely to prevent dust spillage.
1 Abrasive Media Selection
Choose the Right Abrasive:
Steel Grit/Shot: For heavy rust removal on steel and cast iron (coarse grades for aggressive blasting, fine for finishing).
Aluminum Oxide: Hard and long-lasting, ideal for roughening hard metals or removing tough coatings.
Glass Beads: Creates a smooth, satin finish on aluminum, stainless steel, or plastic without excessive material removal.
Walnut Shells/Corn Cob: Gentle abrasives for delicate surfaces like wood, vintage parts, or plastic.
Abrasive Size Considerations:
applicationCoarse particles (e.g., 30 steel grit) remove material faster but leave a rougher surface.
applicationFine particles (e.g., 120 glass beads) produce smoother finishes but take longer.
2 Loading Abrasive Media
Hopper Filling:
applicationEnsure the abrasive feed valve is closed before opening the cabinet door.
applicationPour abrasive into the hopper, not exceeding the maximum fill line (typically 80% capacity to prevent overflow).
applicationFor wet blasting cabinets, mix water and abrasive according to the manufacturer’s ratio (usually 1:10 water-to-abrasive).
3 Powering On and Pressure Adjustment
Start-Up Sequence:
1. Close the cabinet door and ensure the latch is secure.
2. Turn on the dust collection system (if separate from the main power).
3. Activate the air compressor and allow it to reach full pressure.
4. Adjust the pressure regulator on the cabinet to your desired PSI (start at 40 PSI for testing, increase as needed).
Pressure Guidelines:
applicationDelicate tasks (etching, deburring): 20-40 PSI
applicationStandard cleaning (rust, paint): 40-60 PSI
applicationHeavy-duty removal (scale, thick coatings): 60-80 PSI (consult your cabinet’s limits)
4 Basic Blasting Technique
Nozzle-to-Workpiece Distance:
Maintain 4-8 inches for optimal results: closer distances increase intensity, while longer distances provide wider coverage.
Angle of Operation:
Hold the nozzle at 45-90 degrees to the surface. A 90-degree angle maximizes material removal; lower angles are gentler.
Movement Pattern:
Use slow, overlapping passes (2-4 inches per second) in a side-to-side or up-and-down motion to ensure even blasting. Avoid lingering in one spot, which causes over-blasting and surface damage.
Safety Protocols and Regulations
1 Personal Protective Equipment (PPE)
Respiratory Protection:
applicationNon-hazardous abrasives (glass beads, walnut shells): N95 or higher particulate respirator.
applicationHazardous abrasives (silica, lead-contaminated media): Supplied-air respirator with HEPA filtration or a full-face positive-pressure hood.
Eye and Face Protection:
applicationWear safety glasses or goggles under the cabinet’s viewing window for added protection against stray particles.
Hearing Protection:
applicationBlasting can exceed 90 dB; use earplugs or earmuffs to prevent hearing damage.
Hand and Body Protection:
applicationEnsure the cabinet’s gloves are intact; replace torn gloves immediately. For extended use, wear thin inner gloves to prevent skin irritation.
2 Operational Safety Guidelines
Cabinet Sealing:
Never operate the cabinet with a damaged door seal or open access ports, as this allows dust leakage.
Emergency Stop:
Familiarize yourself with the location of the emergency stop button and test it monthly to ensure functionality.
Nozzle Safety:
applicationNever point the blasting gun at anyone, yourself, or unprotected surfaces.
applicationTurn off air supply and release pressure before changing nozzles or performing maintenance.
3 Environmental Compliance
Dust Emission Control:
applicationEnsure the dust collection system is always operational during blasting.
applicationDispose of dust and used abrasive according to local regulations, especially if containing hazardous materials (e.g., lead paint, silica).
Noise Regulations:
If operating in a residential area, check local noise ordinances and consider soundproofing the work area or limiting operation to reasonable hours.
1 Surface Preparation for Specific Applications
Painting and Coating Adhesion:
applicationAchieve a surface roughness of 50-75 microns (Ra) using medium-grade steel grit, ensuring paint or powder coat adheres effectively.
applicationFor electroplating, use fine abrasives like glass beads to create a uniform, clean surface.
Deburring and Edge Finishing:
applicationUse low pressure (20-30 PSI) and fine abrasives (e.g., 120 aluminum oxide) to remove burrs without rounding edges excessively.
Artistic Etching and Texturing:
applicationFor glass or stone, use baking soda or fine glass beads at 15-25 PSI, adjusting distance and movement speed to control etching depth.
2 Troubleshooting Common Issues
Inconsistent Blasting Performance:
applicationCheck air pressure: Ensure the compressor meets CFM/PSI requirements.
applicationInspect abrasive feed: Clear clogs in the hopper or feed valve, ensure the valve is fully open.
applicationReplace worn nozzles: Tungsten carbide nozzles wear over time, affecting flow and pressure.
Excessive Dust Inside or Outside the Cabinet:
applicationCheck filter condition: Replace clogged primary or HEPA filters.
applicationInspect seals: Replace damaged door gaskets or glove port cuffs.
applicationVerify negative pressure: Ensure the dust collector is functioning and vents are unobstructed.
Abrasive Flow Interruptions:
applicationCheck for moisture in the hopper: Store abrasive in a dry place and use an air dryer on the compressor.
applicationClean the siphon tube (for siphon systems): Remove debris that may block the abrasive intake.
3 Wet Blasting Operations (If Applicable)
Water-Abrasive Mixture:
applicationMaintain a 1:10 water-to-abrasive ratio for optimal performance. Too much water reduces blasting force; too little increases dust.
Nozzle Maintenance:
applicationWet blasting nozzles may require more frequent cleaning to prevent mineral buildup from hard water.
Rust Prevention:
applicationAfter blasting metal parts, rinse with clean water and apply a rust inhibitor to prevent corrosion, especially in humid environments.
Routine Maintenance Schedule
1 Daily Maintenance
Clean Viewing Window:
Wipe the interior and exterior of the viewing window with a non-abrasive, anti-static glass cleaner to maintain visibility.
Empty Dust Drawer:
Remove and empty the dust collection drawer, ensuring no buildup that could restrict airflow.
Inspect Gloves and Cuffs:
Check for tears or abrasions in the gloves and replace them if damaged to maintain a sealed environment.
2 Weekly Maintenance
Air Hose and Connections:
Inspect hoses for cracks, leaks, or excessive wear. Tighten any loose fittings and replace damaged hoses immediately.
Nozzle Condition:
Examine the nozzle tip for wear (it should maintain a circular shape). Replace if the opening is oval or irregular, which affects blast pattern.
Abrasive Quality Check:
Sort used abrasive to remove large contaminants (paint chips, metal flakes). Replace media if it appears excessively fine or contaminated.
3 Monthly Maintenance
Filter Replacement/ Cleaning:
applicationPrimary filters: Clean or replace cloth/cartridge filters to maintain dust collection efficiency.
applicationHEPA filters: Inspect for clogs; replace every 6-12 months or when pressure drop indicators show reduced airflow.
Lubrication:
Apply silicone spray to the abrasive feed valve and any moving parts (hinges, latches) to prevent sticking and corrosion.
Pressure Gauge Calibration:
Verify the accuracy of pressure gauges using a calibrated tester; replace if readings are inconsistent.
4 Quarterly/Annual Maintenance
Cabinet Interior Inspection:
Examine the interior for abrasive buildup, especially in corners and along the work tray. Use a vacuum to remove debris.
Dust Collector Motor Check:
For cabinets with built-in dust collectors, clean the motor housing and check bearings for smooth operation.
Safety System Testing:
Test the emergency stop function, door interlocks, and pressure relief valves to ensure they operate correctly.
1 Storage and Handling
Moisture Prevention:
applicationStore abrasive media in airtight containers with desiccant packets to prevent clumping, which clogs feed systems.
applicationFor outdoor storage, place containers on pallets to avoid ground moisture.
Media Segregation:
applicationKeep different abrasives separate to prevent contamination. Use labeled containers for steel shot, glass beads, etc.
Hazardous Media Handling:
applicationWhen using toxic abrasives (e.g., silica), store them in a locked, ventilated area and follow local hazardous material regulations.
2 Recycling and Disposal
Abrasive Recycling:
applicationFor non-hazardous media like steel shot or glass beads, use a sieve or cyclonic separator to remove dust and contaminants for reuse.
applicationExpect to recycle steel shot 5-10 times before performance declines; glass beads may reuse 3-5 times.
Waste Disposal:
applicationNon-hazardous dust and used abrasive can be disposed of with regular industrial waste.
applicationHazardous waste (lead, asbestos, or silica-contaminated media) must be disposed of through certified waste handlers, following EPA or local regulations.
| Material | Recommended Abrasive | Grit Size | Pressure (PSI) | Purpose |
|---|---|---|---|---|
| Carbon Steel | Steel Grit/Shot | 30–80 | 40–80 | Heavy-duty rust removal, surface roughening for coating adhesion |
| Aluminum | Glass Beads, Plastic Media | 80–120 | 20–40 | Deburring without scratching, achieving satin finishes on soft metals |
| Stainless Steel | Aluminum Oxide, Ceramic Beads | 60–100 | 30–50 | Scale removal, preparing surfaces for welding or passivation |
| Wood/Plastic | Walnut Shells, Corn Cob | Fine | 10–25 | Non-destructive cleaning, gentle texturing for decorative woodworking |
| Glass/Stone | Baking Soda, Extra Fine Abrasive | Extra Fine | 10–20 | Etching artistic patterns, creating decorative finishes on fragile substrates |
Troubleshooting Guide
1 Low Blasting Power
Possible Causes:
applicationInadequate air pressure (compressor not meeting CFM/PSI requirements).
applicationClogged abrasive feed valve or siphon tube.
applicationWorn nozzle (opening enlarged, reducing velocity).
Solutions:
applicationCheck compressor output; adjust or upgrade if insufficient.
applicationDisassemble and clean the feed system, removing any debris or moisture.
applicationReplace the nozzle with a new tungsten carbide tip.
2 Excessive Dust Emission
Possible Causes:
applicationDamaged door seal or glove ports.
applicationClogged dust filters.
applicationDust collector not powered on or malfunctioning.
Solutions:
applicationInspect and replace seals/cuffs; ensure the door is fully latched.
applicationClean or replace filters; check for proper installation.
applicationVerify the dust collector is operational; replace the motor if necessary.
3 Inconsistent Abrasive Flow
Possible Causes:
applicationMoisture in the abrasive causing clumping.
applicationAbrasive too fine for the feed system.
applicationFeed valve partially closed or stuck.
Solutions:
applicationDry the abrasive or use a desiccant; install an air dryer on the compressor.
applicationUse coarser abrasive suitable for your cabinet’s design.
applicationLubricate the feed valve; disassemble to remove obstructions.
4 Noisy Operation
Possible Causes:
applicationLoose components inside the cabinet.
applicationWorn dust collector fan blades.
applicationAir leaks causing turbulence.
Solutions:
applicationTighten any loose bolts or panels.
applicationInspect the fan for debris or damage; replace if necessary.
applicationCheck hose connections and seals for leaks; tighten or replace as needed.
Storage and Winterization
1 Long-Term Storage
Empty and Clean:
applicationRemove all abrasive media and dust from the hopper, work tray, and dust drawer.
applicationWipe down the interior with a dry cloth to prevent corrosion.
Protect Moving Parts:
applicationApply a light coat of silicone grease to hinges, latches, and valves to prevent rust.
applicationCover the cabinet with a breathable, dust-proof cover to protect from environmental elements.
2 Winterization (For Cold Climates)
Prevent Freezing:
applicationDrain any water from wet blasting systems or compressed air lines to prevent freezing and damage.
applicationUse an antifreeze solution in wet blasting tanks if storing in unheated areas.
Compressor Care:
applicationDrain moisture from the compressor tank and lines to avoid ice buildup during operation.
Warranty and Customer Support
1 Warranty Terms
Coverage Details:
applicationMost cabinets come with a 1-year warranty on parts and labor, with some manufacturers offering 2-3 years for structural components.
applicationWarranty typically excludes wear-and-tear items like nozzles, gloves, and filters.
Claims Process:
applicationKeep your purchase receipt and warranty card in a safe place.
applicationContact customer support immediately for defective parts, providing serial numbers and photos of the issue.
2 Customer Support Resources
Manufacturer Contacts:
applicationVisit the manufacturer’s website for FAQs, video tutorials, and downloadable manuals.
applicationCall customer service for technical support during business hours.
Authorized Service Centers:
applicationLocate nearby authorized service centers for professional maintenance or repairs, especially for complex issues.
Environmental Responsibility and Sustainability
1 Eco-Friendly Practices
Biodegradable Abrasives:
applicationUse walnut shells, corn cob, or recycled glass abrasives for non-hazardous applications to reduce environmental impact.
Energy Conservation:
applicationTurn off the compressor and dust collector when not in use to save electricity.
applicationOpt for LED interior lighting to reduce energy consumption.
Sand Blasting Cabinet Manual: A Comprehensive Guide to Operation, Maintenance, and Safety
2 Recycling and Waste Reduction
Abrasive Recycling:
applicationMaximize reuse of abrasives like steel shot to minimize waste; consult your manufacturer for recycling guidelines.
E-Waste Disposal:
applicationWhen retiring your cabinet, dispose of electronic components (such as control panels, sensors, or motors) through certified e-waste recycling centers. These facilities ensure proper handling of hazardous materials like lead in circuit boards and prevent environmental contamination.
Filter Disposal:
HEPA filters and other dust collection filters may contain trapped hazardous particles. Check local regulations for proper disposal methods; some areas require special handling to avoid releasing contaminants into landfills.
3 Sustainable Upgrades
Retrofitting for Efficiency:
Consider upgrading older cabinets with energy-efficient components. For example, replace traditional dust collector motors with variable speed drives that consume less power during low-intensity operations.
Using Renewable Energy:
If possible, power your sand blasting cabinet with renewable energy sources like solar panels or wind turbines. This not only reduces your carbon footprint but can also lead to long-term cost savings on electricity bills.
Training and Certification
1 Operator Training
In-House Training:
For industrial settings, conduct in-house training sessions for new operators. Cover basic operation, safety protocols, and emergency procedures. Provide hands-on practice with the cabinet, emphasizing proper blasting techniques and equipment handling.
External Training Programs:
Some regions offer professional sand blasting training courses, often certified by industry associations. These programs provide in-depth knowledge of advanced techniques, regulatory compliance, and specialized applications (such as blasting in hazardous environments).
2 Certification Requirements
Industry Standards:
In certain industries, especially aerospace, defense, and shipbuilding, operators may need to be certified to specific standards (e.g., NADCAP for aerospace). These certifications ensure that the blasting process meets stringent quality and safety requirements.
Environmental Certifications:
For companies aiming to demonstrate sustainable practices, obtaining certifications like ISO 14001 (Environmental Management Systems) can be beneficial. This involves implementing processes to minimize the environmental impact of sand blasting operations, including proper waste management and energy conservation.
Customization and Modifications
1 Adding Accessories
Turntable Installations:
For improved accessibility and even blasting, consider adding a turntable inside the cabinet. This is especially useful for round or symmetrical parts, allowing operators to treat all surfaces without manual repositioning.
LED Lighting Upgrades:
Enhance visibility inside the cabinet by installing additional LED light strips. Look for models with IP ratings suitable for dusty environments to ensure durability.
2 Performance Enhancements
Upgrading the Dust Collection System:
If your cabinet's existing dust collector struggles to handle high volumes of dust, replace it with a more powerful unit. Look for models with higher CFM ratings and advanced filtration stages for better particle capture.
Installing a Pressure Regulator with Gauge:
For more precise control over blasting pressure, add an external pressure regulator with a gauge. This allows operators to fine-tune settings without relying solely on the cabinet's built-in controls.
3 Safety Modifications
Adding Safety Interlocks:
Install additional safety interlocks to prevent the cabinet from operating when the door is open or the gloves are removed. This provides an extra layer of protection against accidental dust exposure.
Emergency Shower and Eyewash Stations:
In industrial settings where hazardous abrasives are used, consider installing emergency shower and eyewash stations nearby. These are crucial for immediate response in case of accidental exposure to harmful particles.
Case Studies: Real-World Applications
1 Automotive Restoration
Scenario:
A classic car restoration shop uses a manual sand blasting cabinet to remove rust and old paint from body panels.
Solution:
The operator selects medium-grade steel grit and sets the pressure to 50 PSI. By using slow, overlapping passes and rotating the panels on a turntable, they achieve an even surface finish, preparing the metal for priming and painting.
Result:
The restored panels have improved paint adhesion, significantly extending the lifespan of the coating and enhancing the overall appearance of the vehicle.
2 Artisanal Glass Blasting
Scenario:
An artist creates custom-etched glassware using a manual sand blasting cabinet.
Solution:
Fine baking soda abrasive is chosen, and the pressure is set to a low 15 PSI. The artist uses a stencil to protect areas that should remain un-etched and carefully controls the movement of the blasting gun to create intricate designs.
Result:
The glassware features detailed, professional-quality etchings, showcasing the precision achievable with manual sand blasting techniques.
. Glossary of Terms
Abrasive Media: The material (such as sand, steel shot, or glass beads) propelled by compressed air to clean, shape, or finish surfaces.
CFM (Cubic Feet per Minute): A measurement of the volume of air flow in a compressed air system.
HEPA Filter: High-Efficiency Particulate Air filter, capable of trapping 99.97% of particles 0.3 microns or larger.
PSI (Pounds per Square Inch): A unit of pressure measurement, indicating the force exerted by compressed air in the blasting system.
Siphon Blasting: A method where compressed air creates a vacuum to draw abrasive media into the airflow, resulting in a less aggressive but more controlled blast.
Venturi Effect: The reduction in fluid pressure that occurs when a fluid (such as air) flows through a constricted section of a pipe, used in siphon blasting systems to draw in abrasive media.
Operating a sand blasting cabinet safely and effectively requires a combination of technical knowledge, proper maintenance, and adherence to safety protocols. By following the guidelines outlined in this manual, you can ensure consistent, high-quality results while protecting yourself, your colleagues, and the environment. Whether you're a novice user or an experienced professional, continuous learning and regular equipment upkeep are key to maximizing the performance and lifespan of your sand blasting cabinet. Should you encounter any issues or have further questions, refer back to this manual or contact your manufacturer's customer support for assistance.
sign up newsletter
Email:cennia@szmizhi.com
Add::104,Building 27,Third Industrial Zone, Longxi Community,Longgang District,Shenzhen,China.