Hotline
+86-136 8495 9862
Email:cennia@szmizhi.com
Add::104,Building 27,Third Industrial Zone, Longxi Community,Longgang District,Shenzhen,China.
Coil Forming & Handling Equipment
Surface Treatment Equipment
Solutions
Application
About Us

Welcome to MIZHI
For consultation/feedback, please call the service hotline: +86-136 8495 9862 Email:cennia@szmizhi.com

Coil Forming & Coil Handling Solutions
Surface Treatment Solutions


In industrial manufacturing, metalworking, woodworking, and DIY projects, achieving a clean, uniform, and precisely treated surface is often critical for subsequent processes such as painting, plating, welding, or adhesive bonding. A sand blast cabinet kit (also known as a bead blast cabinet or abrasive blast cabinet) is a specialized enclosed system designed to propel abrasive media at high speeds onto workpieces, removing contaminants, rust, paint, or creating specific surface textures. Unlike open air blasting, which can be messy and inefficient, a blast cabinet contains the abrasive flow, ensuring precision, safety, and minimal environmental impact. This comprehensive guide explores the components, types, applications, and benefits of sand blast cabinet kits, catering to professionals and enthusiasts alike.
A typical sand blast cabinet kit consists of several essential components that work together to deliver efficient and controlled blasting:
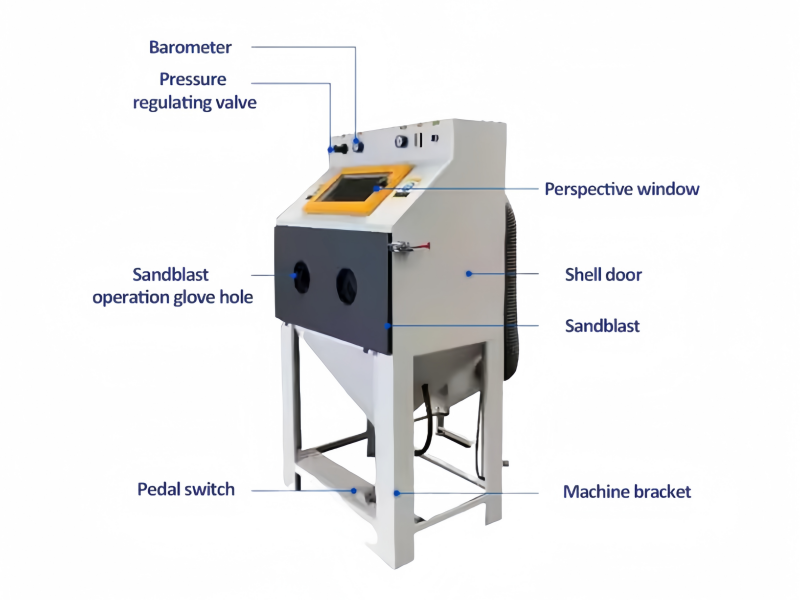
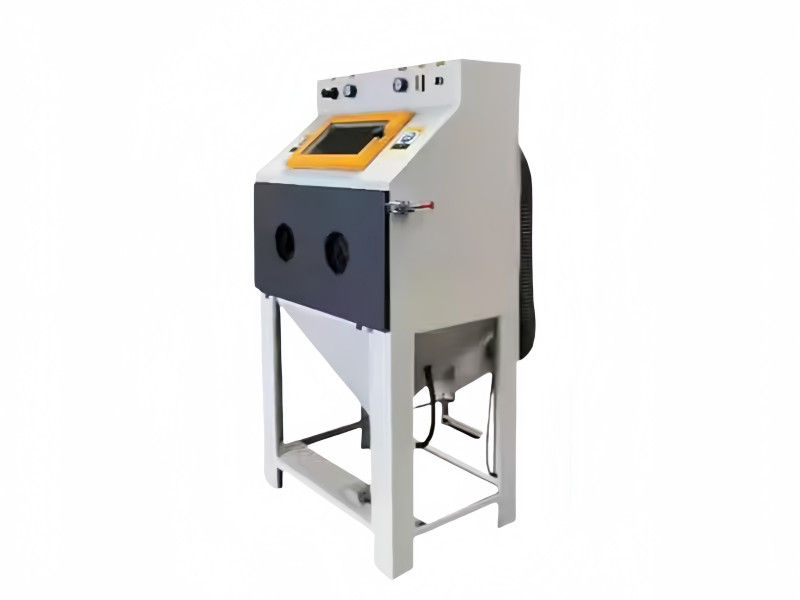
1. Enclosure/Cabinet
Structure: Made of durable steel, aluminum, or polycarbonate, the cabinet provides a sealed environment to contain abrasive media and prevent dust leakage.
Visibility: Features a large viewing window (often with protective glass or polycarbonate) and interior lighting (LED or fluorescent) for clear visibility during operation.
Access Ports: Rubber gloves or arm length gloves attached to the cabinet walls allow operators to manipulate workpieces without opening the cabinet, maintaining pressure and containment.
2. Blasting System
Blast Gun: The handheld tool that directs abrasive media at the workpiece. It includes a nozzle (usually tungsten carbide for durability) and a trigger or valve to control abrasive flow.
Abrasive Hopper: A storage container for abrasive media, often with a siphon or pressure fed mechanism to deliver media to the blast gun.
Air Supply Connection: Links to a compressed air source (air compressor), providing the force to propel abrasives. Pressure regulators allow adjustments for different materials and tasks.
3. Filtration and Dust Collection
Exhaust System: Filters out fine dust and debris from the cabinet, preventing contamination and improving air quality. Many kits include a HEPA filter for high efficiency particle removal.
Abrasive Recycling System: Some advanced kits feature a reclaiming mechanism that separates usable abrasive media from dust and debris, allowing for reuse and reducing waste.
4. Worktable and Fixtures
Rotating or Adjustable Tray: Holds workpieces and allows for easy positioning. Some cabinets have magnetic or clamp fixtures to secure parts during blasting.
Drain Valve: Facilitates the removal of spent abrasives and debris from the bottom of the cabinet.
Sand blast cabinet kits are categorized based on their blasting mechanism, size, and intended use. Here are the main types:
1. Siphon Fed (Suction) Blast Cabinets
How They Work: Use the Venturi effect created by compressed air to draw abrasive media from the hopper into the blast gun.
Pressure Range: Typically 40 100 PSI, suitable for light to medium blasting tasks.
Ideal For: Small to medium workpieces, such as automotive parts, jewelry, or woodcraft.
Advantages:
Affordable and easy to operate, no need for a high pressure air compressor.
Low maintenance, simple design.
Disadvantages:
Less powerful than pressure fed systems, slower for heavy duty tasks.
Abrasive flow may be less consistent.
2. Pressure Fed Blast Cabinets
How They Work: Store abrasive media in a sealed pressure pot that uses compressed air to force media into the blast gun at high pressure.
Pressure Range: 80 150 PSI or higher, ideal for heavy duty applications.
Ideal For: Removing tough coatings, rust, or scale from metal parts, industrial components, or large tools.
Advantages:
Faster and more efficient for heavy stripping or texturing.
Consistent abrasive flow for uniform results.
Disadvantages:
Requires a more powerful air compressor (10+ CFM).
Higher upfront cost due to the pressure pot and complex design.
3. Wet Blast Cabinets
How They Work: Mix abrasive media with water to create a slurry, reducing dust and static cling. The slurry is propelled by compressed air.
Pressure Range: 50 100 PSI.
Ideal For: Indoor use, delicate surfaces (e.g., electronics, wood), or environments where dust control is critical.
Advantages:
Minimal dust, compliant with strict safety and environmental regulations.
Gentler on materials, less risk of overheating or drying out workpieces (e.g., wood or plastic).
Disadvantages:
Requires drainage for wastewater, may complicate cleanup.
Slower abrasive flow compared to dry blasting.
4. Benchtop Blast Cabinets
Size and Design: Compact, table top models with a small work chamber (e.g., 18” x 12” x 10”), ideal for hobbyists or small workshops.
Features:
Lightweight and portable.
Siphon fed system with low pressure requirements (20 60 PSI).
Ideal For: Small parts like screws, jewelry, model kits, or electronics components.
5. Industrial Grade Blast Cabinets
Size and Design: Large cabinets (6+ feet in height/length) with heavy duty construction, suitable for commercial or industrial use.
Features:
Pressure fed systems with high capacity hoppers (50+ lbs of abrasive).
Advanced dust collection and abrasive recycling systems.
Built in lighting and ergonomic glove ports for extended use.
Ideal For: Automotive workshops, metal fabrication shops, or aerospace component cleaning.
Applications of Sand Blast Cabinet Kits
Sand blast cabinet kits are used across various industries and projects for their precision and versatility. Here are some common applications:
1. Automotive and Motorcycle Restoration
Tasks:
Stripping old paint, rust, or undercoating from car bodies, engine parts, or motorcycle frames.
Preparing surfaces for powder coating or painting by creating a rough texture for better adhesion.
Cleaning and deburring cast aluminum parts (e.g., cylinder heads, carburetors).
Example: A classic car enthusiast uses a pressure fed blast cabinet to remove decades of rust from a vintage steel bumper, revealing a smooth surface ready for priming.
2. Metalworking and Fabrication
Tasks:
Removing mill scale from newly fabricated steel parts.
Etching serial numbers or logos onto metal components using stencils and abrasive blasting.
Preparing weld surfaces by removing contaminants, ensuring stronger welds.
Example: A metal artist uses a benchtop blast cabinet to texture a stainless steel sculpture, creating a unique, finish.
3. Woodworking and Crafts
Tasks:
Gentle stripping of paint or varnish from wooden furniture using soda or walnut shell abrasives.
Creating decorative textures on wood, such as (aged) effects or intricate patterns.
Cleaning and preparing wooden carvings or musical instruments (e.g., guitar bodies) for finishing.
Example: A furniture maker uses a wet blast cabinet to distress a pine bookshelf, highlighting the grain without damaging the softwood.
4. Jewelry and Metal Art
Tasks:
Polishing and texturing silver, gold, or bronze jewelry pieces using glass beads or baking soda.
Etching designs onto metal pendants or rings with high precision.
Removing fire scale from metal after soldering or welding.
Example: A jewelry designer uses a small benchtop blast cabinet to create a frosted finish on a copper pendant, contrasting with polished areas for a striking effect.
5. Electronics and Precision Parts
Tasks:
Cleaning circuit boards or delicate electronic components without damaging them (using gentle abrasives like baking soda or dry ice).
Removing conformal coatings or encapsulants from PCBs for repair or rework.
Example: An electronics technician uses a wet blast cabinet with deionized water and fine abrasives to clean a corroded motherboard, restoring functionality.
6. Industrial Maintenance
Tasks:
Descaling and cleaning machinery parts (e.g., gears, valves, pumps) in factories or plants.
Preparing metal surfaces for anti corrosion coatings in marine or offshore environments.
Example: A power plant uses an industrial pressure blast cabinet to remove calcium deposits from turbine components, improving efficiency.
1. Precision and Consistency
The enclosed environment allows for controlled blasting, ensuring uniform results across the workpiece. Operators can adjust pressure, abrasive type, and nozzle distance to achieve specific surface profiles (e.g., roughness for paint adhesion or smoothness for plating).
2. Safety and Environmental Friendliness
Reduced Dust: Unlike open blasting, cabinets contain abrasive particles and dust, minimizing exposure to harmful substances like silica (when using silica based abrasives).
Contained Workspace: Prevents debris from spreading, making it safer for operators and compliant with workplace health and safety regulations (e.g., OSHA in the U.S.).
3. Cost Efficiency
Abrasive Recycling: Many kits include reclaim systems that separate usable media from waste, reducing abrasive consumption by up to 80%.
Time Savings: Faster than manual sanding or chemical stripping for many tasks, especially on complex or irregular surfaces.
Considerations Based on Project Scale
DIY/Hobbyist: Benchtop or small siphon fed cabinets (e.g., Eastwood Bench Top Blast Cabinet) are ideal for occasional use on small parts.
Professional Workshops: Medium to large pressure fed or wet cabinets (e.g., Clemco 2030 Series) for daily use and heavy duty tasks.
Industrial Use: Large industrial cabinets with automated reclaim systems (e.g., Blastman Robotics) for high volume production.
Air Compressor Requirements
Siphon fed cabinets: Require 5 10 CFM (cubic feet per minute) at 40 80 PSI.
Pressure fed cabinets: Need 10 20 CFM at 80 150 PSI. Ensure your air compressor matches the kit’s requirements to avoid underperformance.
Abrasive Compatibility
Check the cabinet’s hopper size and reclaim system compatibility with your chosen abrasives. For example, wet cabinets require abrasives that can mix with water without clumping (e.g., walnut shells, sand).
Budget
Benchtop Kits: $200 $800 (purchase), $50 $150 (rent).
Medium Professional Kits: $1,000 $5,000 (purchase), $200 $500 (rent).
Industrial Kits: $10,000+ (purchase), $1,000+ (rent).
Setup and Operation Best Practices
1. Assembly and Installation
Follow the manufacturer’s instructions to assemble the cabinet, ensuring all seals are tight to prevent leaks.
Place the cabinet on a stable, level surface. For industrial kits, secure it to the floor if necessary.
Connect the air supply and ensure the pressure regulator is calibrated correctly.
2. Loading Abrasives
Fill the hopper with the chosen abrasive, leaving enough space for airflow. Avoid overfilling, as this can clog the system.
For reclaim systems, ensure the separation grid or filter is clean and properly positioned to trap dust and debris.
3. Safety Checks
Test the viewing window for clarity and replace any scratched or damaged protective glass.
Inspect the gloves for tears or leaks, as these can expose your hands to abrasives.
Turn on the dust collector and ensure it’s operating efficiently before starting.
4. Blasting Technique
Hold the Gun Properly: Maintain a 45° angle to the workpiece and a distance of 6 12 inches, depending on pressure and abrasive.
Use Steady Motions: Move the gun in slow, overlapping passes to ensure even coverage. Avoid lingering in one area to prevent over blasting.
Adjust Pressure Gradually: Start at low pressure (e.g., 40 PSI) and increase as needed to achieve the desired result without damaging the workpiece.
5. Maintenance and Cleaning
Daily: Empty the dust collector and clean the viewing window.
Weekly: Check the gloves, nozzles, and hoses for wear and tear. Replace worn parts (e.g., tungsten carbide nozzles degrade over time).
Monthly: Inspect the abrasive reclaim system for clogs or blockages. Clean the hopper and remove any accumulated dust or debris.
Troubleshooting Common Issues
Issue 1: Inadequate Blast Pressure
Causes: Clogged nozzle, low air pressure, or blocked abrasive flow.
Solutions:
Disassemble the nozzle and clear any debris.
Check the air compressor output and adjust the pressure regulator.
Ensure the abrasive hopper is not empty or compacted.
Issue 2: Excessive Dust Leakage
Causes: Worn gloves, damaged seals, or a faulty dust collector.
Solutions:
Replace the gloves or repair tears with patch kits.
Inspect door seals and apply silicone caulk if needed.
Clean or replace the dust collector filter.
Issue 3: Uneven Blasting Results
Causes: Inconsistent abrasive flow, dirty viewing window, or improper gun technique.
Solutions:
Shake the hopper gently to loosen compacted abrasives.
Clean the viewing window for better visibility.
Practice steady, uniform gun movements and maintain consistent distance/angle.
Issue 4: Abrasive Media Not Recycling Properly
Causes: Clogged reclaim grid, incorrect airflow settings, or incompatible abrasives.
Solutions:
Brush or vacuum the reclaim grid to remove dust and debris.
Adjust the air intake valve to improve airflow in the reclaim system.
Switch to a finer or coarser abrasive that matches the reclaim system’s specifications.
Advanced Tips for Optimal Performance
1. Use Stencils for Etching
Create custom designs or text by placing stencils on the workpiece before blasting. This is ideal for marking parts, creating logos, or adding decorative elements.
2. Pre Treat Workpieces
For heavily rusted or painted parts, apply a chemical stripper first to remove thick layers, reducing abrasive consumption and blasting time.
3. Recycle Abrasives Strategically
Sort spent abrasives by size using sieves to reuse larger particles for heavy duty tasks and dispose of fine dust. This extends the life of your abrasive media.
4. Invest in Anti Static Mats
Place an anti static mat inside the cabinet to reduce static cling of abrasives to workpieces, especially when using plastic or non conductive materials.
Safety and Environmental Compliance
Personal Protective Equipment (PPE)
Always wear a respirator or supplied air hood, even inside a blast cabinet, as fine dust can escape through seals over time.
Use hearing protection if the cabinet’s exhaust system or air compressor is noisy.
Environmental Considerations
Abrasive Disposal: Dispose of spent abrasives according to local regulations. Hazardous materials (e.g., abrasives contaminated with lead paint) require special handling.
Energy Efficiency: Choose cabinets with low power dust collectors or energy efficient air compressors to reduce utility costs.
Regulatory Compliance
In the U.S., ensure compliance with OSHA standards for silica exposure (if using silica based abrasives) and noise levels. Use silica free abrasives (e.g., aluminum oxide, walnut shells) to minimize risks.
Market Trends in Sand Blast Cabinet Technology
1. Smart Blast Cabinets
Advanced models now feature digital pressure displays, automatic abrasive recycling, and even IoT connectivity to monitor performance and maintenance needs.
2. Eco Friendly Designs
Manufacturers are developing cabinets with built in water recycling systems for wet blasting and using recycled materials in cabinet construction.
3. Portable and Modular Kits
For on site work, portable blast cabinets with built in air compressors and dust collectors are gaining popularity, allowing professionals to set up quickly in remote locations.
4. Hybrid Blasting Systems
Some kits now support both dry and wet blasting, offering versatility without needing separate equipment.
sign up newsletter
Email:cennia@szmizhi.com
Add::104,Building 27,Third Industrial Zone, Longxi Community,Longgang District,Shenzhen,China.